Ordering the PCBs
The TNY-360 contains 7 custom PCBs, each serving a specific purpose in the robot's electronics architecture.
These PCBs have been designed to save space, simplify assembly, and to ensure a certain level of quality and reliability in the connections between components.
1 - List of PCBs
You can find all design files (Gerber, BOM, PickAndPlace) in the GitHub repository.
Here's the list of all the PCBs you will need for this build:
| PCB | Purpose | Quantity | Files |
|---|---|---|---|
| Main Board | Robot brain and main controller | 1 | GitHub PCB Files |
| Analog Reader | Sensor interface board | 1 | GitHub PCB Files |
| Motor Driver | Motor control board | 1 | GitHub PCB Files |
| Power Board | Power distribution | 1 | GitHub PCB Files |
| Paw Board | Legs multiplexing and power management | 2 | GitHub PCB Files |
| Plug Board | Universal Mount interface | 1 | GitHub PCB Files |
| Servo Board | Custom MG996R servo modification board | 12 | GitHub PCB Files |
To order the PCBs, please follow the PCB Ordering Guide for detailed instructions on how to prepare the files and place your order with a PCB manufacturer.
2 - How to order the PCBs
Regardless of the manufacturer you choose, there's always a standard process to follow when ordering custom PCBs, with a couple of settings to specify to ensure the boards are fabricated correctly.
Here's what you need to know about the PCB ordering process and the recommended settings for the TNY-360 PCBs:
PCB Files Preparation
For each of the 7 PCBs used in the TNY-360, you will find the design files in the GitHub repository.
Each PCB folder contains these files :
- Gerber Files: These are the standard files required by PCB manufacturers to fabricate the boards. They include all the necessary layers (copper, silkscreen, solder mask, etc.) and drill information.
- Bill of Materials (BOM): A list of all the components needed for the PCB, including part numbers and recommended suppliers.
- Pick and Place Files: These files indicate the exact placement of components on the PCB, which can be used for automated assembly if supported by the manufacturer.
These files are standard and common for PCB manufacturing, and you should be able to upload them directly to the manufacturer's website when placing your order.
If not, please contact us so that we can find a solution to ensure you can get the PCBs without any issues.
Recommended Parameters for PCB Manufacturing
When placing your order with a PCB manufacturer, ensure you specify the following parameters to match the design requirements of the TNY-360 PCBs:
| Parameter | Recommended Value | Description |
|---|---|---|
| Layers | 2 | Standard two-layer PCB for cost-effectiveness and sufficient functionality. |
| Board Thickness | 1.6mm | Standard thickness for durability and mechanical stability. |
| Copper Weight | 1oz (35µm) | Standard copper thickness for reliable electrical performance. |
| Solder Mask Color | Black or Green | Aesthetic choice. Green is more common and may be cheaper, while black can give a sleek look. |
| Silkscreen Color | White | Provides good contrast for component labels and markings. |
| Material Type | FR4 | Standard PCB material for reliability and performance. |
Servo board thickness
Please use a thickness of 0.8mm for the Servo Board to ensure it fits properly within the MG996R servo casing.
Using a thicker board may cause fitting issues and could require modifications of the servo shell.
Ordering the stencil
While most components on the PCBs aren't extremely small, we highly recommend ordering a solder paste stencil along with your PCBs if you plan on assembling the boards yourself.
A stencil will make the soldering process much easier and more precise, especially for the main board which has a high density of components and complex connectors.
3 - How to order the components
We recommand ordering the PCBs already assembled by the manufacturer (PCB Assembly service) to save time and ensure a high-quality assembly, especially for the main board which has a high density of components and complex connectors.
But if you want to order the components separately and assemble the boards yourself, here's what you need to know :
The BOM files
Every PCB folder in the GitHub repository contains a Bill of Materials (BOM) file, which lists all the components needed for that specific PCB, along with their part numbers and other notes.
Use these BOM files to find and order the components from your preferred suppliers. You can use platforms like Mouser, Digi-Key or LCSC.
Matching components
The availability of components can vary based on your location, the supplier you choose, and the current market conditions. If you find that some components are out of stock or unavailable, here's how to find suitable alternatives:
- Same footprint: Ensure that the alternative component has the same physical footprint as the original one, so it can fit on the PCB without requiring modifications.
- Same specifications: Check that the electrical specifications (voltage, current, power rating, etc.) of the alternative component match those of the original to ensure proper functionality and safety.
- Check the datasheet: Always refer to the component's datasheet to verify that the alternative meets all necessary requirements and is compatible with the design.
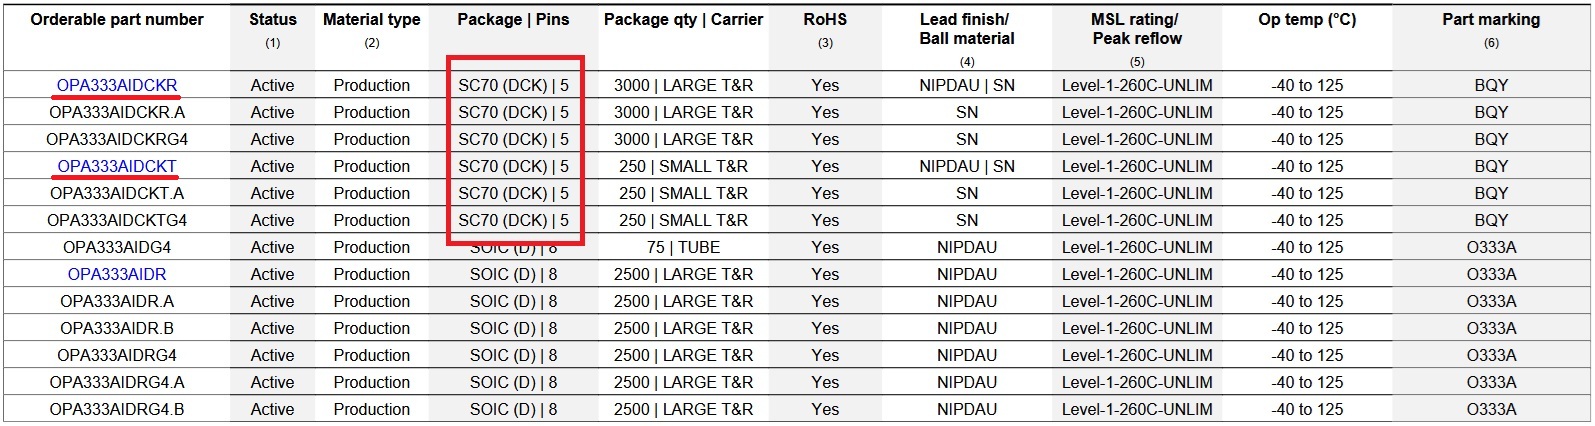
Example
The Operational Amplifier used on the Servomotor PCB is known as the OPA333. The specific version used in the design (and the BOM file) is the OPA333**AIDCKT**.
However, this version is often out of stock or unavailable from many suppliers (including LCSC).
By checking the OPA333 Datasheet, we can find a bunch of alternatives with the same specifications and footprint (SC-70-5),
such as the OPA333AIDCKR for example, which is often in stock and available on Mouser, or on LCSC.
Ask the community
If you have trouble finding a specific component or need help finding a suitable alternative, don't hesitate to ask the community for help! You can talk to us via our Discord server or send us an email at contact@tny-robotics.com.
Well ... Now comes the worst part of any project ... Waiting for everything to arrive!
If you ordered the PCBs already assembled, you can start preparing the flashing tools and software to be ready as soon as the boards arrive ! If not, you can start preparing your workspace and tools for the assembly process by following the PCB Soldering Guide.